
Custom bucket hats are more than a logo slapped on a crown. A good design feels comfortable, fits the right people, and matches the style of your brand. When you get it right, customers don’t just accept a hat—they reach for it again and again.
As a result, a bucket hat stops being a basic giveaway and starts working as a tiny billboard for your brand. Every selfie, every beach day, and every game turns into free advertising.
In this guide, we’ll walk through how to design custom bucket hats that people actually want to wear—starting from fabric and fit, then moving to logo placement, decoration methods, and finally the small details that separate “free merch” from “favorite hat”.
1. Start with the Base: Fabric, Fit & Colour
Before you think about artwork, you need a bucket hat people enjoy wearing. Therefore, your first step is making smart choices on fabric, shape, and colour.
1.1 Choose the Right Fabric
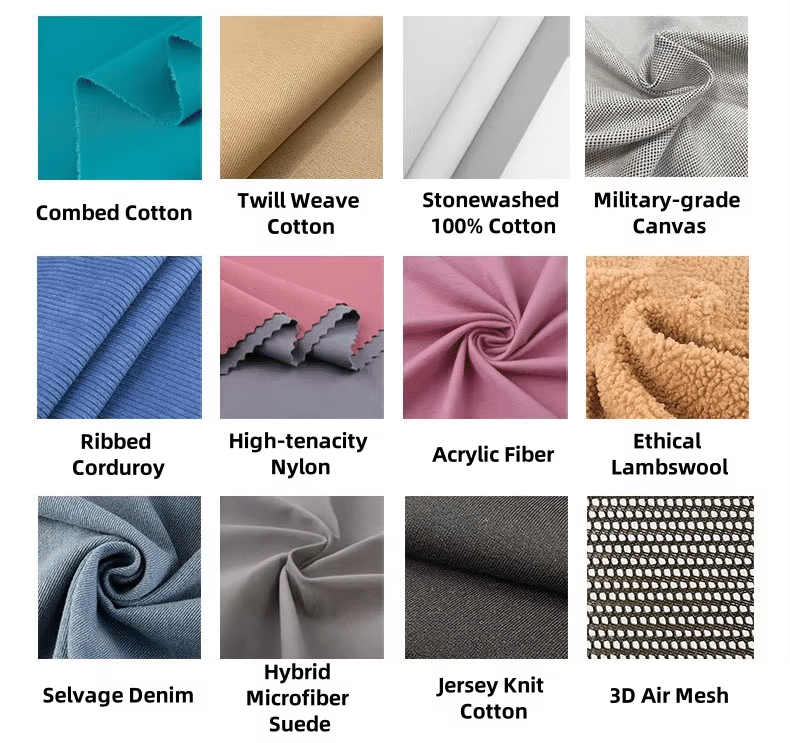
Different fabrics create very different looks and comfort levels. Because of this, you should start with where and how the hat will be used.
- Cotton twill
Soft, breathable, and easy to wear all day. It is great for casual streetwear, campus merch, and everyday branded bucket hats. - Canvas
A bit heavier and more structured. Consequently, it is ideal for brands that want a more premium or “workwear” feel with clean logo placement. - Nylon or polyester
Lightweight and quick-drying. Therefore, these fabrics are perfect for outdoor events, fishing, running clubs, summer festivals, and travel. - Denim or corduroy
These materials add texture and fashion appeal. As a result, they work well for limited drops, retail collections, and streetwear brands. - Terry, fleece or sherpa
Cozy and eye-catching, often used in winter bucket hats or fashion-forward collections.
In short, think about climate and activity first. A heavy canvas bucket hat might be too warm for a beach club, while a thin nylon hat may feel too sporty for a high-end brewery taproom.
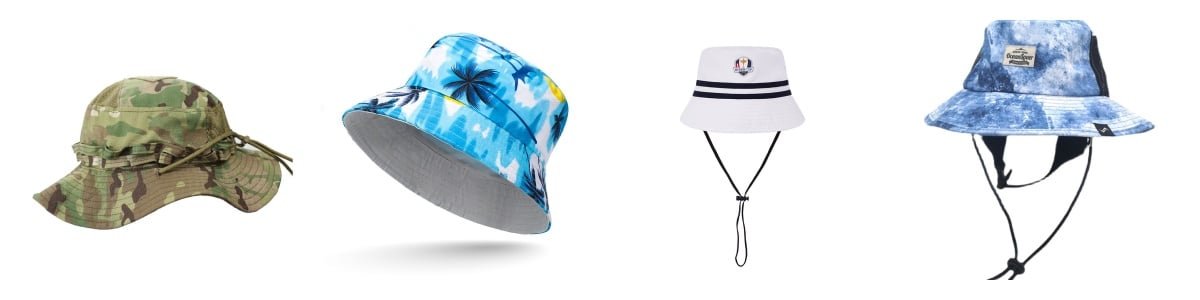
1.2 Decide on Shape and Structure
Bucket hats may look simple, but small shape choices change how they feel on the head. For this reason, it helps to decide on structure early.
- Structured vs. relaxed
- Structured bucket hats keep their shape, with firmer crowns and brims. They’re ideal for bold logos, embroidery, and crisp branding.
- Relaxed or “floppy” bucket hats feel softer and more laid-back—great for beachwear, festivals, and lifestyle brands.
- Brim length
- Standard brim: a balanced look for most audiences and everyday use.
- Wide brim: more shade and coverage—good for outdoor crews, lifeguards, and sun protection.
- Short brim / micro brim: more fashion-driven, often used by streetwear labels.
- Crown depth & add-ons
Deeper crowns sit more securely and work well for active use. In addition, you can add eyelets for ventilation or a chin strap / drawcord if the hat will be worn on boats, beaches, or windy fields.
If you’re unsure, first order a sample size run so your team can test fit before placing a bulk order.
1.3 Build a Colour Strategy
Colour is often the first thing people notice—sometimes even before your logo. Because of that, a simple colour strategy makes a big difference.
- Neutrals (black, khaki, beige, navy, grey)
These shades are safe, timeless, and easy to style. They are great for premium brands, corporate merch, and resale. - Bold colours (red, royal blue, bright yellow, kelly green, neon tones)
These tones offer high visibility and high energy. For example, they work well for sports teams, youth events, festivals, and promotions. - Patterns and special looks
Tie-dye, camouflage, checkerboard, gradient prints, or contrast panels can make your bucket hat instantly more memorable.
Whichever base colour you choose, contrast matters. A dark hat needs a light logo (and vice versa) so your branding reads clearly in real life and in photos. In addition, if your brand has a specific palette, ask your manufacturer about Pantone-matched trims or thread.
2. Start with the Wearer, Not the Logo
It’s tempting to begin with artwork. However, the most wearable bucket hats are designed around the people who will wear them.
Ask yourself:
- Who will actually wear this?
Fans at a music festival, brewery regulars, resort guests, high school students, or sales reps on the road? - Where will they wear it?
Beach, city streets, sports events, hiking trails, or trade shows? - How do you want it to feel?
Fun and playful, clean and minimal, sporty and technical, or retro and nostalgic?
For example:
- Streetwear brand → mid or low crown, heavier cotton or denim, strong colours, bold front logo.
- Resort or beach club → lightweight cotton or straw-style bucket hat, light neutrals, subtle branding, optional chin strap.
- Sports team or club → durable fabric, team colours, clear logo, sweatband that actually works.
- Corporate merch / giveaways → versatile colours, one-size-fits-most fit, simple logo that suits many outfits.
When you design for a specific wearer and setting, you automatically avoid many of the design mistakes that lead to “drawer merch”. In other words, you give people a reason to choose your hat over others.
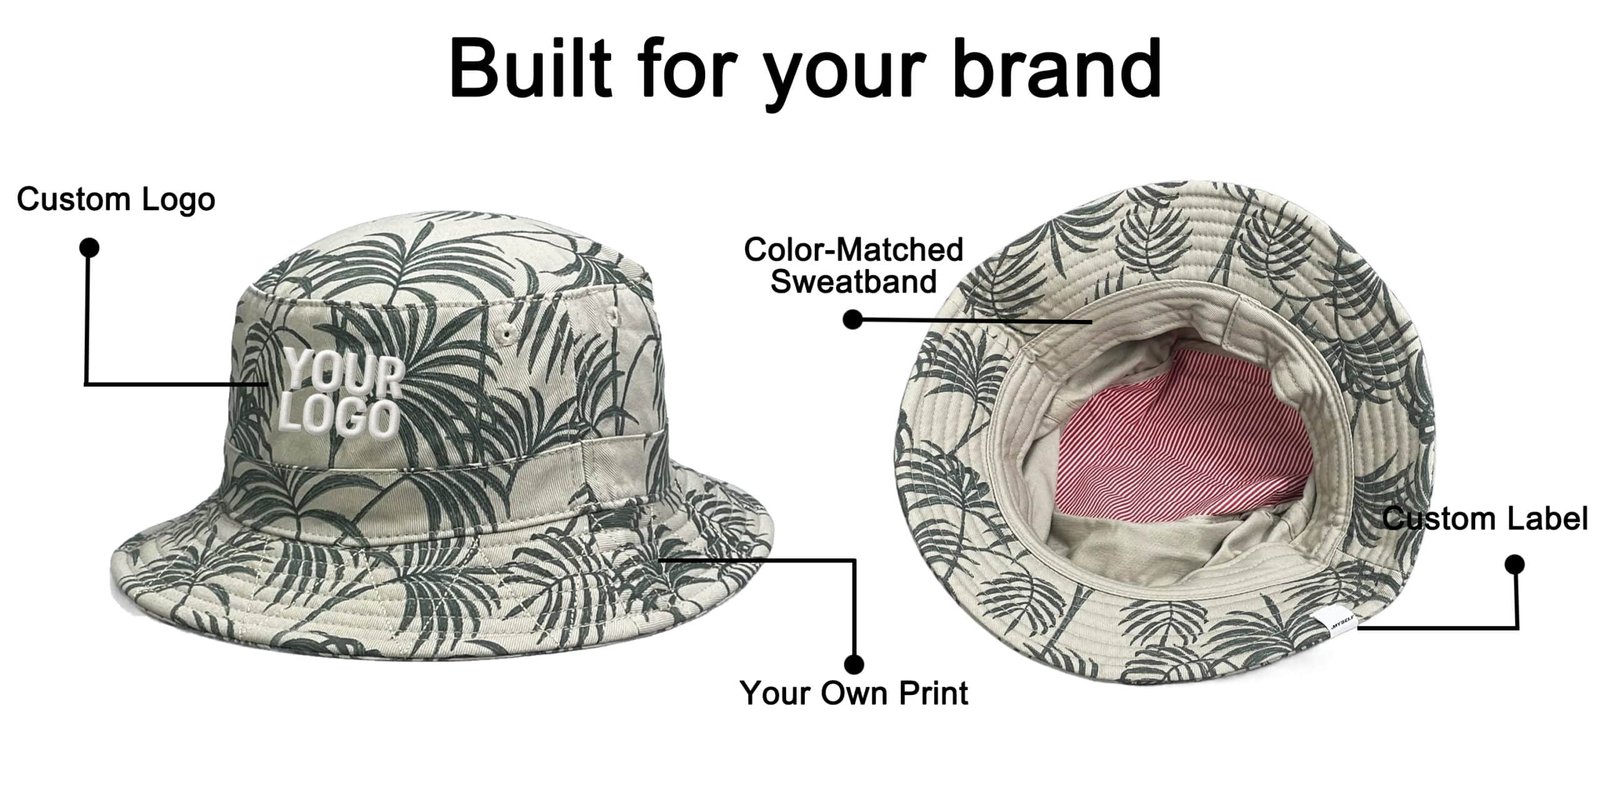
3. Logo Placement: Where Your Branding Works Best
Once the base hat is locked in, it’s time to decide where your logo or artwork should go. This decision matters because placement influences how the hat looks from a distance and how often people actually wear it.
3.1 Front and Center
The classic option is front and center on the crown.
- This placement works best for simple, bold logos or short brand names.
- On most bucket hats, a width of around 2.5–3 inches (6.5–7.5 cm) keeps the logo readable without overwhelming the crown.
- As a result, it is ideal for teams, clubs, and brands that want maximum recognition in photos and events.
3.2 Side, Back, and Partial Branding
Sometimes less is more. Therefore, side or back branding can be a smart move.
- Side placement
Great for initials, secondary icons, or subtle branding. You can also pair a side logo with a small front icon for a layered look. - Back branding
A small embroidery or printed logo on the back can be a nice surprise when people see the hat from behind. - Woven or printed labels
A small woven label on the side seam or brim edge gives a retail finish and works well for brands that prefer low-key branding.
3.3 Under-Brim and Interior Details
Hidden or semi-hidden branding turns the hat into more of a “designer” product.
- Under-brim prints
Patterns, slogans, or artwork on the underside of the brim look great when the hat is lifted or tilted and create a strong “wow” moment. - Inside labels
Custom care labels, size labels, or branded taping inside the crown can carry extra messaging or website info and make the hat feel premium.
Altogether, think of logo placement as a system: one main logo for recognition, plus one or two subtle details for personality.
4. Decoration Methods: Embroidery, Patches, or Print?
There are several ways to get your design onto a bucket hat. The right method depends on your artwork, budget, and desired look. In many cases, mixing methods works best.
4.1 Flat Embroidery
- Strengths
Durable, textured, and professional. It works very well for simple logos, text, and icons. - Best for
Sports teams, corporate branding, breweries, and any brand that wants a classic, long-lasting finish. - Watch out for
Very small text or thin lines; they may need to be thickened for clean stitching.
4.2 3D Puff Embroidery
- Strengths
Raised, bold, and eye-catching. This style is common in streetwear and team merchandise. - Best for
Single-letter marks, initials, and simple logos with strong outlines. - Watch out for
Complex shapes, small details, and multi-colour gradients. In many cases, these will require extra setup and more simplification.
4.3 Woven, PVC, or Leather Patches
Instead of stitching the logo directly onto the hat, you can add a patch.
- Woven patches
Good for detailed logos with sharper lines and small text. - PVC / rubber patches
Modern, durable, and weather-resistant. They are great for outdoor and surf brands. - Faux leather patches
Warm and premium. They are often used by breweries, coffee roasters, and lifestyle brands.
Patches can be sewn on or heat-pressed, depending on the material. In addition, they are ideal if you want to reuse the same patch on multiple hat colours or styles.
4.4 Printed Logos (Screen, Heat Transfer, or Sublimation)
- Strengths
Printed logos handle full-colour artwork, gradients, and photo-style prints that embroidery can’t reproduce. - Best for
Art-driven brands, festival merch, tourism, and campaigns where illustration and colour are the star. - Watch out for
Very heavy washing or long-term sun exposure can affect some prints over time. Therefore, it’s important to follow care instructions and use quality inks and films.
Many successful brands combine methods—for example, a front embroidered logo plus a printed under-brim pattern and a woven inside label. This layered approach adds depth without making the design feel busy.
5. Common Design Mistakes (and How to Avoid Them)
Even strong brands sometimes end up with bucket hats nobody wears. Fortunately, you can avoid most problems by watching for a few common mistakes.
- Mistake 1: Logo is too complicated
- Problem: fine lines, tiny text, and too many colours don’t translate well to embroidery or small spaces.
- Fix: simplify the design, remove tiny details, and reduce the colour count for the hat version of your logo.
- Mistake 2: Poor colour contrast
- Problem: navy logo on a black hat, or pale yellow on beige—your branding disappears in real life and in photos.
- Fix: use high contrast: light-on-dark or dark-on-light. Additionally, always ask for a digital mockup on the exact hat colour.
- Mistake 3: Wrong hat for the setting
- Problem: heavy canvas in hot climates, or a floppy fashion hat for a serious business event.
- Fix: match fabric and structure to climate and purpose—technical materials for outdoor use, softer fabrics for lifestyle wear.
- Mistake 4: One-size-fits-nobody
- Problem: hats that sit too high, feel tight, or blow off easily will stay in the closet.
- Fix: check size specs, test samples on real people, and consider offering two size options if your audience is diverse.
- Mistake 5: Ignoring the end user
- Problem: focusing only on what looks good in a mockup, not what fits your customer’s wardrobe.
- Fix: ask yourself, “Would my customer actually wear this with their normal clothes?” If not, adjust colours, logo size, or style.
By handling these issues early, you protect your budget and create bucket hats that stay in rotation rather than in storage.
6. From Idea to Finished Bucket Hat: A Simple Process
To turn your design into a wearable product, follow a clear step-by-step plan. This process keeps your project on track from first idea to final shipment.
- Define your audience and purpose
First, decide who will wear the hat and where. Is it for resale, a limited drop, staff, or a one-time event? - Choose the base hat
Next, select fabric, structure (structured vs. relaxed), brim length, and colour that match your brand and use case. - Pick decoration method and placement
Then choose embroidery, patch, or print, and decide where the logo will go (front, side, under-brim, inside label). - Prepare artwork correctly
After that, send vector files (AI, EPS, high-res PDF) with clear colour notes. If any lines are too thin, ask your supplier for recommendations. - Approve mockups and samples
Before production, review digital mockups first, then a physical sample if possible. Check comfort, fit, and overall look. - Confirm quantity, lead time, and packaging
Finally, finalise your order, discuss shipping timelines, and decide whether you want individual bagging, barcodes, or retail-ready packaging.
When you design with the wearer in mind, choose the right base hat, and make smart branding choices, your custom bucket hats don’t just promote your logo—they become the pieces people keep in rotation. As a result, a simple hat turns into a long-term brand asset.
Ready to turn your ideas into real products? Visit our Custom Bucket Hats with Logo page to choose fabrics, colours, and decoration options, and get a free mockup for your brand.